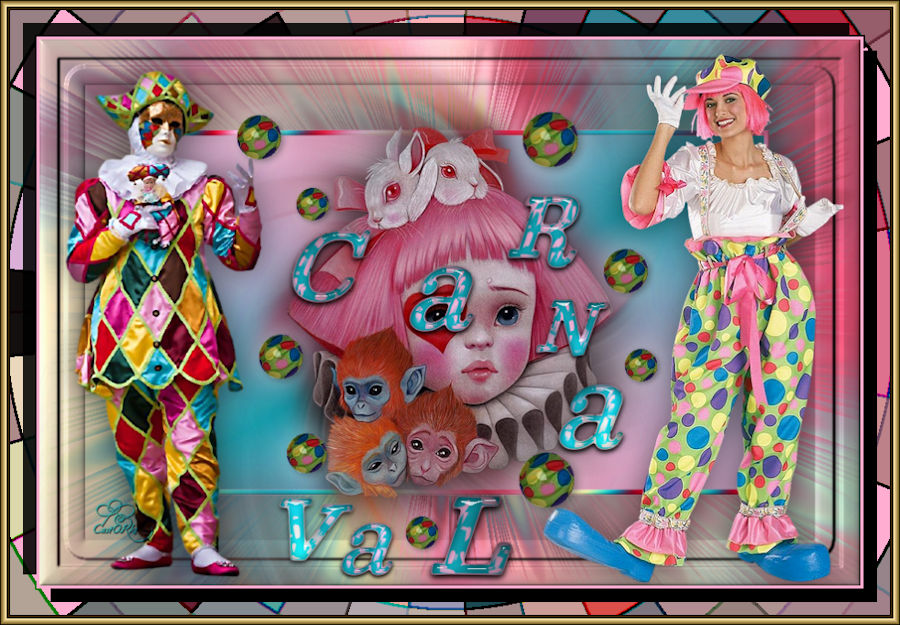
Carnival Lesson16
Translated by Marion.
Thank you.

Take me with you, I'll show you where you left off.
![]()
1. Open your color palette in your psp.
2. File-Open a new transparent image in this size : 900 x 600 Px
3. -Material Properties: Set your Foreground color to color 2, Set your Background color to color 1
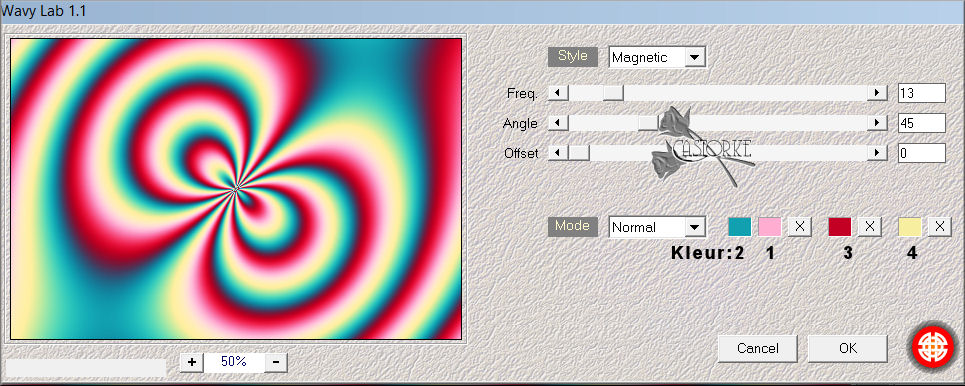
4. Effects/ Plugins/ Mehdi WavyLab1.1 use the settings below
5. Adjust- Blur- Radial Blur use the settings below

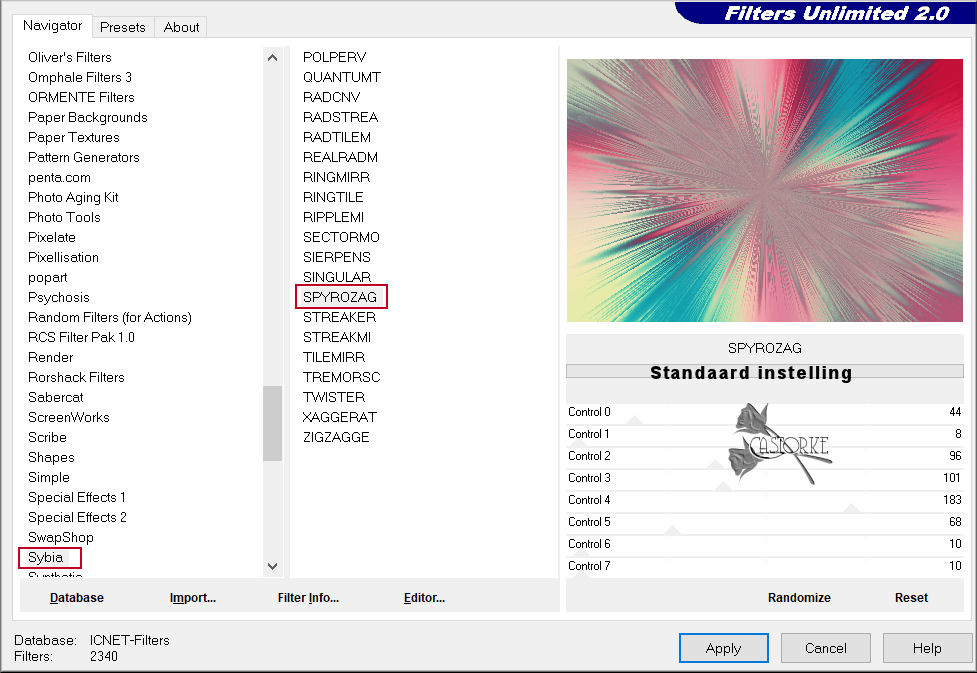
6. Effects / Plugins/Filters in Unlimited 2.0 / Sybia-Spirozag - default settings
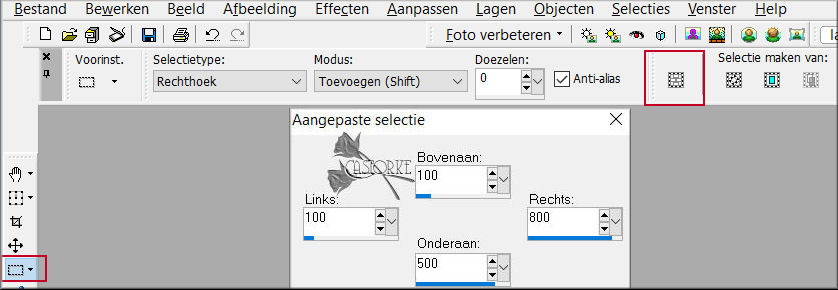
7. Activate Selection Tool -Custom Selection (S) -Rectangle with these settings
8. Foreground color to color 2 -- Background color to color 1
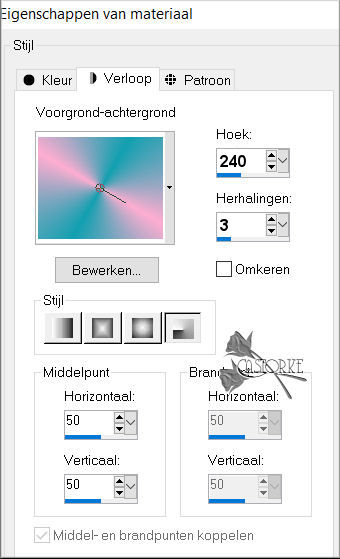
Replace your Foreground color with a Foreground/Background Radial Gradient configured like this
9. Layers- New Raster Layer.
10. Flood Fill Tool – Fill the layer with the Gradient
11. Layers- New Raster Layer.
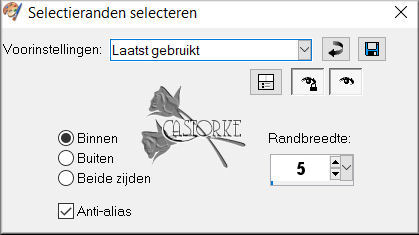
12. Selections-Modify-Select Selection Borders-Inside -5
13. Effects/ Plugins/ Mehdi WavyLab1.1 use the settings below
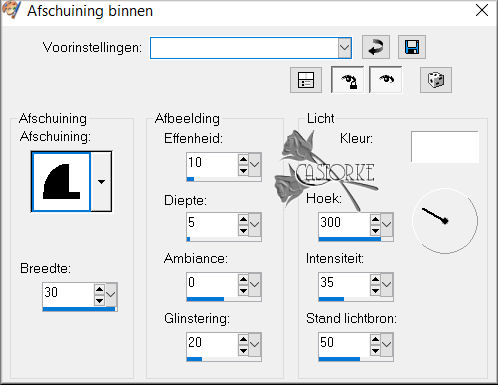
14. Effects-3D-Effects-Inner Bevel use the settings below - number 11
15. Selections- Select None.
16. Effects- 3D-Effects-Drop Shadow with these settings: 0, 0, 50, 50 color black.
17. Activate the bottom of the layer palette (Raster 1)
18.Selections- Select All
19. Selections- Modify- Contract 50 Px
20. Selections / Invert.
21.Selection- Promote selection to layer.
22. Effects-3D-Effects-Inner Bevel use the settings below -number 11
23. Selections- Select None.
24. Activate the top of the layer palette.
25. Open the tube Ina_mooi_21-01-2023
26. Edit- Copy .
27. Activate your work
28. Edit - Paste as new layer
29. Image -Resize 60%
Resize all layers- Not checked
Remove the name.
30. Adjust- Sharpness-Sharpen.
31. Effects- 3D-Effects-Drop Shadow with these settings: 0, 0, 50, 50 color black
32. Layers- Duplicate.
33. Adjust- Blur- Radial Blur
with the same settings
34. Effects- Edge Effects- Enhance More.
35. Layers- Arrange- Move Down.
36. Duplicate the layer 2 times.
37. Activate the top of the layer palette.
38. Open the tube wieskes tube 1878
39. Edit- Copy .
40. Activate your work
41. Edit - Paste as new layer
42. Adjust- Sharpness-Sharpen.
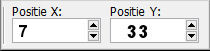
43. Pick Tool: (K) on your keyboard -Enter these parameters on the toolbar X 7 - Y 33
44. Effects- 3D-Effects-Drop Shadow with these settings: 0, 0, 50, 50 color black
45. Open the tube 1293-vmtubes
46. Edit- Copy .
47. Activate your work
48. Edit - Paste as new layer
49. Image Resize 60%
50. Adjust- Sharpness-Sharpen.
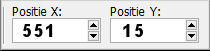
51. Pick Tool: (K) on your keyboard -Enter these parameters on the toolbar: X 551 - Y 15
52. Effects- 3D-Effects-Drop Shadow with these settings: 0, 0, 50, 50 color black.
53. Open the tube castorke_carnaval_les16_bal_all
54. Edit- Copy .
55. Activate your work
56. Edit - Paste as new layer
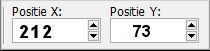
57. Pick Tool: (K) on your keyboard -Enter these parameters on the toolbar X 212 - Y 73
58. Effects- 3D-Effects-Drop Shadow with these settings: 0, 0, 50, 50 color white.
59. Open the tube castorke_carnaval_les16_text
Or write a text of your choice.
60. Edit- Copy .
61. Activate your work
62. Edit - Paste as new layer
63. Pick Tool: (K) on your keyboard -Enter these parameters on the toolbar X 256 - Y 166
64. Add you watermark on new layer
65. Image - Add borders-Symmetric checked: 3 Px color 1
66. Edit- Copy.
67. Open the tube carnaval_les16_kader.
68. Duplicate the image - Shift + D close the original.
On this we continue to work.
69. Activate your Magic Wand Tool and click in the middle of the transparent part
70. Edit - Paste into selection.
71. Selections- Select None.
72. Image- Resize 900 Px width.
Resize all layers- Checked
73. Save as JPG


Copying all or part of this lesson is prohibited.
The lessons are registered with TWI