
Psp Div3_Lesson 227
Translations by Marion into , French, English and German
Translated by Sylviane in Spanish
Translated into Portuguese by Estela
I am grateful for the help of the translators of this site.
Click on the flag for the translation.
This lesson was written by myself
Any resemblance with an ePx-isting lesson is a coincidence
This tutorial was made with Psp 9 but can be done with other versions of Psp.
The colours may vary significantly depending on the Psp used. . .
Without them, this lesson would not be possible.
Respect their work, don't change anything about the tubes and don't say they
are your tubes
The copyright belongs to the original artist.
Leave credit with the creator.
Toadies , *** VM-Stylize
*** Import these filters in Unlimited 2
Material here

Take me with you. I'll show you where you left off.
![]()
Open the tubes in a map of your choice or in the program PSP.
To be on the safe side, duplicate your tubes and image in your Psp:
- Window / Duplicate
- Close the originals and work with the copies

If you take other colors or tubes play with the blend mode
1. Open the color palette
Activate -Dropper Tool and choose your color from the palette.

2. File-Open a New Transparent Image in this size : 900 x 600
3. Flood Fill Tool-Fill the layer with color 2
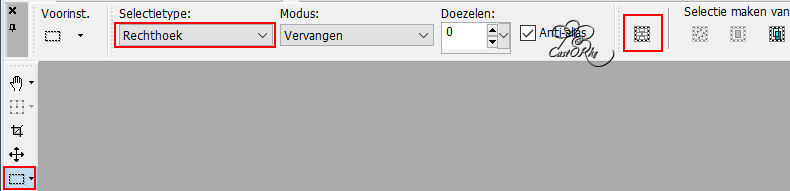
4. Activate Selection Tool -Custom Selection (S) -Rectangle with these settings

5. Selections- Promote selection to layer
(You see nothing
Otherwise, close Raster 1
then don't forget to open)
6. Layers-Properties--Reduce the opacity of this layer to 71%.
7. Selections-Modify-Contract 10 Px-.
8. Press Delete
9. Selections- Invert
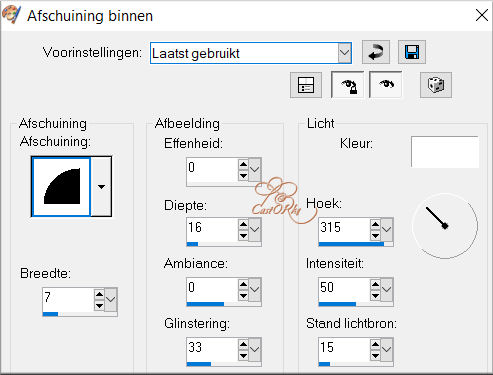
10. Effects- 3D-Effects-Inner Bevel with the following settings
11. Selection remains activated !
12. Effects-3D-Effects-Drop Shadow with these settings: 0, 0, 60, 30 Color 4 (black)
13. Selections- Deselect All
14. Effects-3D-Effects-Drop Shadow with these settings: 1, 1, 100, 0 Color 4(black)
15. Effects-3D-Effects-Drop Shadow with these settings: -1, -1, 100, 0 Color 4 (black)
16. Layers-New Raster Layer.
17. Activate Selection Tool -Custom Selection (S) -Rectangle with these settings

18. Flood Fill Tool-Fill the selection with color 1 (white)
19. Layers-Properties--Reduce the opacity of this layer to 50%
20. Selections- Deselect All.
21. Effects- Plugins- Toadies - What Are You?... with the following settings
Caution: Do not use this filter by unlimited 2 does not give the desired result.

22. Effects- Edge Effects- Enhance More.
23. Effects-3D-Effects-Drop Shadow with these settings: 0, 0, 60, 30 Color 5 #ffff00 (yellow)
24. Layers-Properties-Set the Blend Mode to " Difference"
25. Layers- Arrange- Move Down
26. Activate the bottom of the layer palette=Raster 1
27. Effects- Plugins- VM Stylize/ Motion Trail Wild- use the default settings
28. Layers- Duplicate
29. Image - Mirror - Mirror Horizontal (Image - Mirror in older versions of PSP)
30. Layers-Properties--Reduce the opacity of this layer to 80 %
31. Layers-Properties-Set the Blend Mode to " Difference"
32. Open the tube: Fantasie_Tree_mist_Silvie_10.06.2021
33. Edit- Copy
34. Activate your work
35. Edit-Paste as new layer.
36. Image - Mirror - Mirror Horizontal (Image - Mirror in older versions of PSP)
37. Pick Tool: (K) on your keyboard -Enter these parameters on the toolbar
Position X (min)-206 --- Position Y (min) -37
38. Layers-Properties--Reduce the opacity of this layer to 36%
39. Layers- Duplicate
40. Pick Tool: (K) on your keyboard -Enter these parameters on the toolbar
Position X 263 --- Position Y (min) -114
41. In the layer palette- activate raster 2
Activate your Magic Wand – Tolerance at 0 and Feather at 0
42. Activate the wand and tap in the center of your work..
43. Layers-New Raster Layer.
44. Open the tube: AG_uil
45. Edit- Copy
46. Activate your work
47. Edit- Paste into Selection
48. Layers-Properties--Reduce the opacity of this layer to 75 %
49. Selections- Deselect All
50. Open the tube : castorke_tube_dieren_151_uil
Choose an owl in the color and that you like.
Castorke selected number 15
51. Edit- Copy
52. Activate your work
53. Edit-Paste as new layer.
54. Image/ Resize 2 x 75%
. Resize all layers not checked
55. Pick Tool: (K) on your keyboard -Enter these parameters on the toolbar
Position X 277 - Position Y 51
56. Activate the top of the layer palette.
57. Open the tube: 1(12)
58. Edit- Copy
59. Activate your work
60. Edit-Paste as new layer.
61. Image/ Resize 3 x 75%
62. Place in the upper left corner.
63. Effects-3D-Effects-Drop Shadow with these settings: 0, 0, 80, 10 Color 4 (black)
64. Layers-Duplicate
65. Image - Mirror - Mirror Horizontal (Image - Mirror in older versions of PSP)
66. Image - Mirror - Mirror vertical ( Image - Flip in older versions of PSP)
67. Open the tube: Deco_1_les227
68. Edit- Copy
69. Activate your work
70. Edit-Paste as new layer.
71. Pick Tool: (K) on your keyboard -Enter these parameters on the toolbar
Position X 790 -- Position Y 90
72. Image - Add Borders-Symmetric checked: 1 Px- Color 2
73. Edit- Copy !!!!!!
74. Image - Add Borders-Symmetric checked: 10 Px- Color 3
75. Image - Add Borders-Symmetric checked: 1 Px- Color 2
76. Selections- Select All
77. Image - Add Borders-Symmetric checked: 45 Px- Color 3
78. Selections- Invert
79. Edit- Paste into Selection
80. Adjust- Blur- Radial Blur with the following settings

81. Effects- 3D-Effects-Inner Bevel with these settings- Nr 4 -Color white

82. Selections- Deselect All
83. Image - Add Borders-Symmetric checked: 1 Px- Color 4 black
84. Add your watermark
85. Image-Resize 900 Pixels.
86. Save as JPG
I hope you enjoyed this lesson
I am curious about your work.
Send it to me in original size.
I'll publish it with the examples.
Please include your name and lesson number.
Thank you for creating the lesson.
Questions related to the lesson ? Or submit the lesson ?

Copying this lesson, in whole or in part,
without the author's permission is prohibited.
The lessons are registered with TWI

©Webdesign Diane