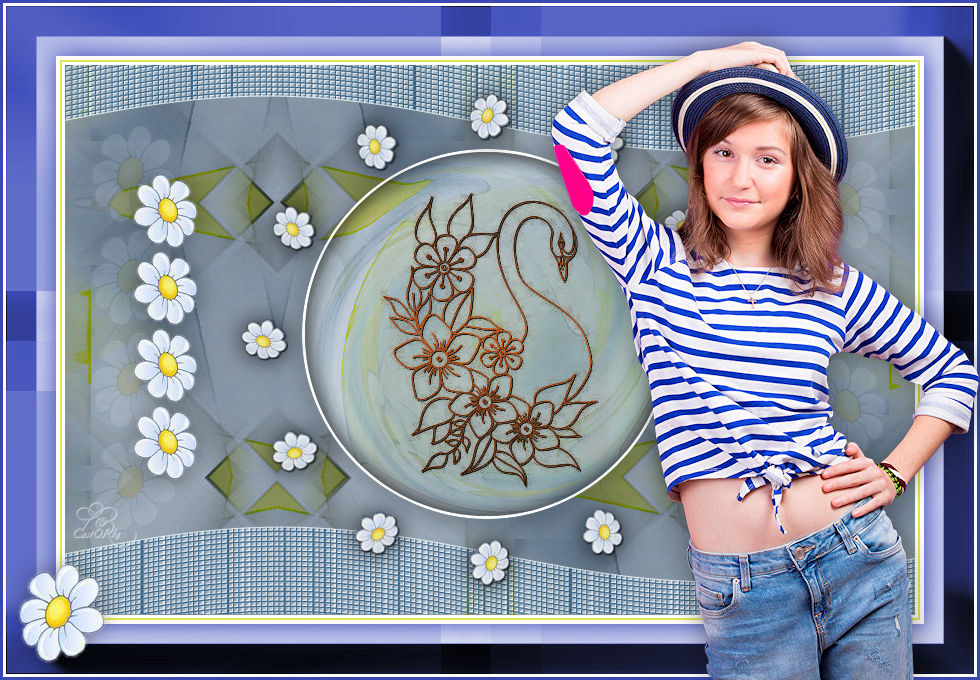
Psp Div3_Lesson 250
Marion translated this lesson into German, English and French.
Thank you Marion
Click on the flag for the translation
This lesson was written by myself Without them, this lesson would not be possible.
Material Colorpallet:
Material Properties: 1. Set your Foreground color to color 1 -- Set
your Background color to color 2
2. Open Castorke Alpha Channel lesson 250 3. SHIFT+ D 4. We continue working on the copy
5. Selections- Select All
6. Open the Background image: AG_les250
7. Edit-Copy
8. Activate your work
9. Edit-Paste into Selection
10. Selections- Deselect All
11. Effects- Plugins-Filters in Unlimited 2/ Simple/ Center Tile
12. Layers- Duplicate
13. Layers-Properties-Set the Blend Mode to " Multiply"
14. Image - Mirror - Mirror Horizontal (Image - Mirror in older versions of
PSP).
15. Image - Mirror - Mirror vertical ( Image - Flip in older versions of PSP)
16. Activate the bottom of the layer palette ( Raster 1)
17. Selections/Load/Save Selection/Load Selection from Alpha Channel -
selection # 1
18. Selections- Promote Selection to Layer
19. Layers- Arrange- Bring to Top
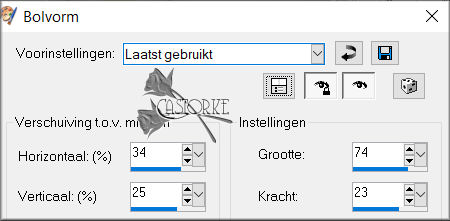
20. Effects-Distortion Effects-Warp use the settings below
Edit-Repeat: -Warp 4
times with the same settings. 21. Selections remains active
22. Layers-New Raster Layer
23. Open the Tube: castorke_deco2_les250
24. Edit-Copy
25. Activate your work
26. Edit-Paste into Selection
27. Layers-Properties-Set the Blend Mode to " Soft Light "
28. Layers-New Raster Layer
29. Effects-3D-Effects- Cutout with these settings: 0, 0, 80, 30 Color 4
30. Layers-New Raster Layer
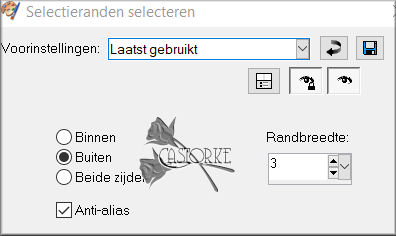
31. Selections- Modify-Select Selection Borders-Outside 3 Px 32. Flood Fill Tool-Fill the selection with the Foreground color =1 (white)
33. Effects-3D-Effects-Drop Shadow with these settings: 1, 1, 100, 30
Color 4
34. Selections- Deselect All
35. Open the Tube : deco_les250
36. Edit-Copy
37. Activate your work
38. Edit-Paste as new layer
39. Effects-3D-Effects-Drop Shadow with these settings: 1, 1, 100, 1
Color 4
40. Activate the Copy of Raster 1 (Second layer from the bottom)
41. Open the Tube : castorke_deco1_les250
42. Edit-Copy
43. Activate your work
44. Edit-Paste as new layer
45. Activate the top of the layer palette
46. Open the Tube; castorke_deco4_les250
47. Edit-Copy
48. Activate your work
49. Edit-Paste as new layer
50. Effects-3D-Effects-Drop Shadow with these settings: 1, 1, 100, 1
Color 4
51. Effects-3D-Effects-Drop Shadow with these settings: 0, 0, 70, 35
Color 4
52. Open the Tube: castorke_deco3_les250
53. Edit-Copy
54. Activate your work
55. Edit-Paste as new layer
56. Pick Tool: (K) on your keyboard -Enter these parameters on the Toolbar
Position X 732 --- Position Y 88
57. Layers- Duplicate
58. Image - Mirror - Mirror Horizontal (Image - Mirror in older versions of
PSP).
59. Pick Tool: (K) on your keyboard -Enter these parameters on the Toolbar
Position X 24 --- Position Y 61
60. Image - Add Borders-Symmetric checked: 3 Px- Color 1
61. Image - Add Borders-Symmetric checked: 2 Px -Color 3
62. Image - Add Borders-Symmetric checked: 3 Px -Color 1
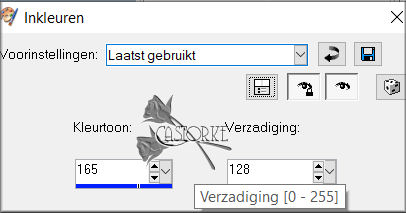
63. Edit-Copy !!!!! 64. Open the Tube: castorke_kader_les250 Adjust-Hue and Saturation-Colorize Hue 165 --- Saturation 128 65. Edit -Paste as new layer (is still in memory) 66. Open the Tube: castorke_tubes_dames_274_082022
67. Edit-Copy
68. Edit-Paste as new layer
69. Remove the name
70. Image- Resize 65%
71. Move as desired or see example.
72. Adjust- Sharpness-Sharpen
73. Effects-3D-Effects-Drop Shadow with these settings: 0, 0, 40, 40 Color 4
74. Open the Tube : deco3A_les250
75. Edit-Copy
76. Edit-Paste as new layer
77. Pick Tool: (K) on your keyboard -Enter these parameters on the Toolbar
Position X 130 --- Position Y 175
78. Effects-3D-Effects-Drop Shadow with these settings: 0, 0, 40, 35 Color 4
79. Openthe Tube: les250_bloem.
80. Edit-Copy
81. Edit-Paste as new layer
82. Effects-3D-Effects-Drop Shadow with these settings: 0, 0, 40, 35 Color 4
83. Place at bottom left or your choice
84. Add your watermark
85. Save as JPG
Am curious about your work. Copying this lesson, in whole or in part,
without the author's permission is prohibited. ©Webdesign Diane
![]()
![]()
![]()
Any resemblance with an existing lesson is a coincidence
This tutorial was made with Corel X8 but can be done with other versions of
Psp.
The colours may vary significantly depending on the Psp used. . .
Respect their work, don't change anything about the tubes and don't say they
are your tubes
The copyright belongs to the original artist.
Leave credit with the creator.
*** *Import these filters into Unlimited 2.

Take me with you, I'll show you where you left off.
![]()
- Window / Duplicate
- Close the originals and work with the copies


Close the original
Castorke colorized the Tube kader les 250
I hope you enjoyed this lesson
Send it to me in original size.
I'll post it with the examples.


The lessons are registered with TW