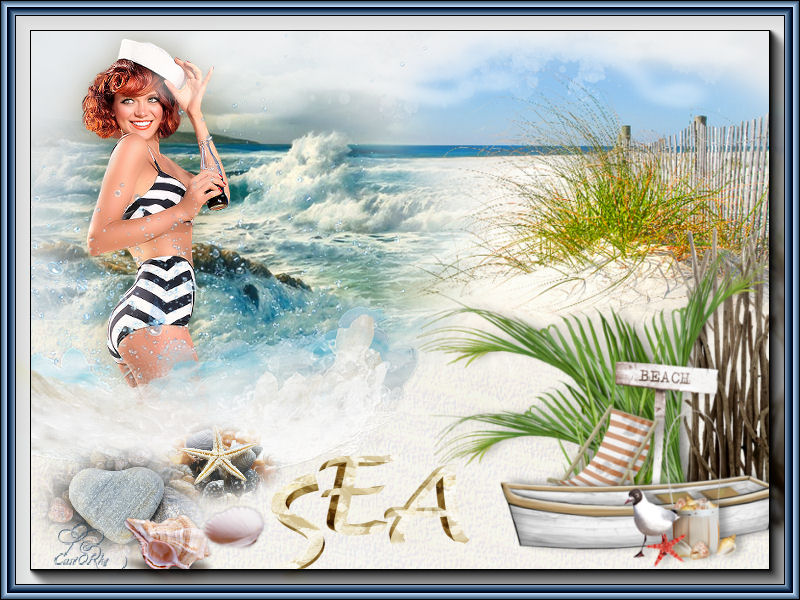
Psp Div3_Lesson 252
Translations by Marion into , French, English and German
Translated by Sylviane in Spanish
Translated into Portuguese by Estela
I am grateful for the help of the translators of this site.
Click on the flag for the translation.
This lesson was written by myself
Any resemblance with an existing lesson is a coincidence
This tutorial was made with Psp X8 but can be done with other versions of
Psp.
The colours may vary significantly depending on the Psp used. . .
Without them, this lesson would not be possible.
Respect their work, don't change anything about the tubes and don't say they
are your tubes
The copyright belongs to the original artist.
Leave credit with the creator.
Take me with you. I'll show you where you left off.
![]()
- Window / Duplicate
- Close the originals and work with the copies

Material Properties:
1. Foreground color : #000000 (zwart)
2. Open the tube: the Background Image AG _les252
3. Shift + D
Close the originalWe continue to work on the duplicate.
4. Open the tube: les252_deco1
5. Edit- Copy
6. Activate your work
7. Edit-Paste as new layer.
8. Pick Tool: (K) on your keyboard -Enter these parameters on the toolbar
Position X 0---Position Y 320
9. Layers-Properties-Set the Blend Mode to " Lighten" – Reduce the opacity of this layer to 60%
11. Open the tube: 2pL_H-yTHVoeeEVx-LL7_l0pYzg
10. Remove the name.
12. Edit- Copy
13. Activate your work
14. Edit-Paste as new layer.
15. Pick Tool: (K) on your keyboard -Enter these parameters on the toolbar
Position X 350--- Position Y 20
16. Open the tube: 4VVmL9rg_ef8-AKlFTARMm3MQp4
17. Edit- Copy
18. Activate your work
19. Edit-Paste as new layer.
20. Pick Tool: (K) on your keyboard -Enter these parameters on the toolbar
Position X (-8) --- Position Y 33
21. Open the tube: Mina@
22. Edit- Copy
23. Activate your work
24. Edit-Paste as new layer.
25. Remove the name.
26. Image- Resize 2 X 75% and 1 X 85%
27. Resize all layers unchecked.
28. Pick Tool: (K) on your keyboard -Enter these parameters on the toolbar
Position X 81--- Position Y 38
29. Effects-3D-Effects-Drop Shadow with these settings: 0, 0, 40, 40 Color black
30. Open the tube: les252_copie_008
31. Edit- Copy
32. Activate your work
33. Edit-Paste as new layer.
34. Pick Tool: (K) on your keyboard -Enter these parameters on the toolbar
Position X 131--- Position Y (-171)
35. Open the tube: les252_copie_092
36. Edit- Copy
37. Activate your work
38. Edit-Paste as new layer.
39. Pick Tool: (K) on your keyboard -Enter these parameters on the toolbar
Position X (-98) ---Position Y (-47)
40. Adjust-Sharpness-Sharpen
41. Open the tube: 3o_d2TlOsmMJrVBLfNNARemEx8s
Edit- Copy
Activate your work
Edit-Paste as new layer.
42.Image- Resize 40%
43. Pick Tool: (K) on your keyboard -Enter these parameters on the toolbar
Position X 21 --- Position Y 437
44. Open the tube: L_BiM6elaQiwrUp9TZZEooOjd4k
Edit- Copy
Activate your work
Edit-Paste as new layer.
45. Image- Resize 30%
46. Pick Tool: (K) on your keyboard -Enter these parameters on the toolbar
Position X 153 --- Position Y 420
47. Layers-Properties-Reduce the opacity of this layer to 85 %
48. Open the tube: les252_copie_059
Edit- Copy
Activate your work
Edit-Paste as new layer.
49. Pick Tool: (K) on your keyboard -Enter these parameters on the toolbar
Position X 120 --- Position Y 511
50. Open the tube: les252_copie_Branches_CD_SeaShore
Edit-
Copy
Activate your work
Edit-Paste as new layer.
51. Pick Tool: (K) on your keyboard -Enter these parameters on the toolbar
Position X 669--- Position Y 223
52. Open the tube: les252_copie_047
Edit- Copy
Activate your work
Edit-Paste as new layer.
53. Pick Tool: (K) on your keyboard -Enter these parameters on the toolbar
Position X 200 --- Position Y 503
54. Open the tube: les_252_copie_Sea #3 (203)
Edit- Copy
Activate your work
Edit-Paste as new layer.
55. Pick Tool: (K) on your keyboard -Enter these parameters on the toolbar
Position X 416--- Position Y 217
56. Open the tube: les252_copie_WordArt_CD_SeaShoreSampler
Edit- Copy
Activate your work
Edit-Paste as new layer.
57. Pick Tool: (K) on your keyboard -Enter these parameters on the toolbar
Position X 271 --- Position Y 453
58. Layers- Merge- Merge Visible
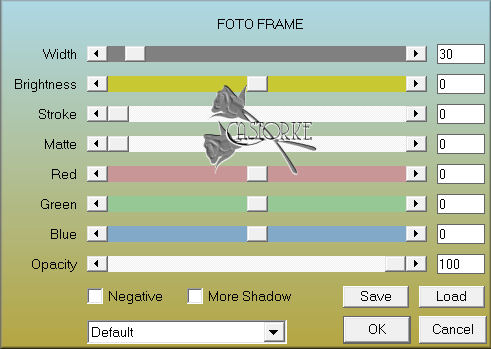
59. Effects-Plugins- AAA Frames/ Foto Frame… with the following settings
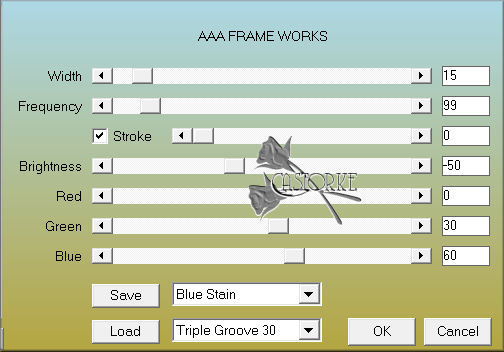
60. Effects-Plugins-AAA Frames/ Frame works...with the following settings
61. Add your watermark
62. Save as JPG
I hope you enjoyed this lesson
I am curious about your work.
Send it to me in original size.
I'll publish it with the examples.
Copying this lesson, in whole or in part,
without the author's permission is prohibited.
The lessons are registered with TWI

©Webdesign Diane

