Open the tubes in a map of your choice or in the program PSP.
Save your work regularly !
ATTENTION: Duplicate your
tubes and work with the copies
1. Open alpha channel_lessons 25_pas.
2. Shift+D Duplicate and close Original
We work on the copy
3.
Selections-Select All
4. Open the image: Easter Fun Papers (16)
5. Edit- Copy
6. Activate your work
7. Edit-Paste -Into Selection
8. Selections- Modify-Contract with 20 Px
9. Selections- Promote
selection to layer
10. Effects- 3D-Effects-Drop Shadow with these settings: 5, 5, 100, 30 -Color
black.(#000000)
11. Selections- Deselect All
12. Open the Tube; deco_1
13. Edit- Copy -Activate your work
- Edit-Paste as new layer
Do not move.
14. Open the Tube : regenboog.
15. Edit- Copy -Activate your work
- Edit-Paste as new layer
16. Pick Tool: (K) on your keyboard -Enter these parameters on the Toolbar :
Position X 129 --- Position Y 20
17. Layers-Properties-Set the Blend Mode to " Overlay "
18. Open the Tube; deco_2
19. Edit- Copy -Activate your work
- Edit-Paste as new layer
20. Pick Tool: (K) on your keyboard -Enter these parameters on the Toolbar:
Position X 5 --- Position Y 0
21. Effects- 3D-Effects-Drop Shadow with these settings: 0, 0, 20, 8, -Color
black
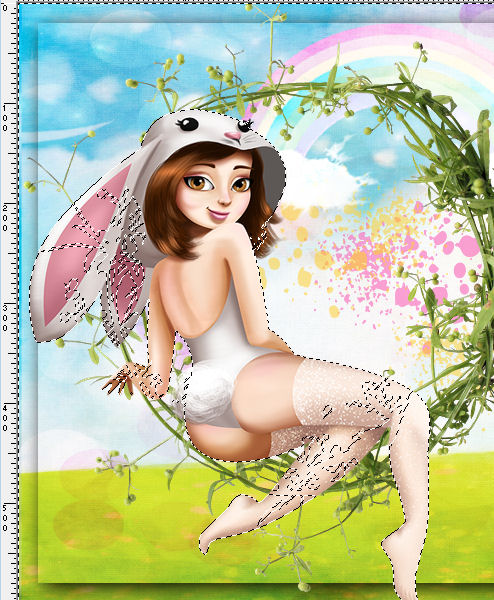
22. Open the Tube: SNC-CAROLINASEABRA-EXCLUSIVE-EASTERBUNNY
23. Edit- Copy -Activate your work
- Edit-Paste as new layer
24. Pick Tool: (K) on your keyboard -Enter these parameters on the Toolbar:
Position X 11 ---- Position Y 106
25. Selections/Load/Save Selection/Load Selection from Alpha Channel-
Selection # 1
26. Eraser Tool
erase with your eraser it completely clean
27. Attention": If you use another Tube then you cannot use the
selection. .
28. Selections- Deselect All
29. If it fails-there is a Tube with the material: Extra_bunny-kader.
Skip points 18 to 27.
30. Effects- 3D-Effects-Drop Shadow with these settings: 0, 0, 20, 8,
Color black
31. Open the Tube : deco_3
32. Edit- Copy -Activate your work
- Edit-Paste as new layer
33. Pick Tool: (K) on your keyboard -Enter these parameters on the Toolbar :
Position X 422 --- Position Y 344
34. Effects- 3D-Effects-Drop Shadow with these settings: 0, 0, 30, 20, -Color
black
35. Open the Tube : deco_4
36. Edit- Copy -Activate your work
- Edit-Paste as new layer
37. Pick Tool: (K) on your keyboard -Enter these parameters on the Toolbar :
Position X 529 --- Position Y 365
38. Effects- 3D-Effects-Drop Shadow with these settings: 0, 0, 30, 20, -Color
black
39. Open deco_9
40. Edit- Copy -Activate your work
- Edit-Paste as new layer
41. Pick Tool: (K) on your keyboard -Enter these parameters on the Toolbar :
Position X 524 ---- Position Y 22
42. Effects- 3D-Effects-Drop Shadow with these settings: 0, 0, 30, 20, -Color
black
43. Open the Tube: deco_11
44. Edit- Copy -Activate your work
- Edit-Paste as new layer
45. Pick Tool: (K) on your keyboard -Enter these parameters on the Toolbar:
Position X 560 --- Position Y 85
46. Effects- 3D-Effects-Drop Shadow with these settings: 0, 0, 30, 20, -Color
black
47. Open the Tube : deco_5
48. Edit- Copy -Activate your work
- Edit-Paste as new layer
49. Pick Tool: (K) on your keyboard -Enter these parameters on the Toolbar:
Position X 373 Position Y 168
50. Effects- 3D-Effects-Drop Shadow with these settings: 0, 0, 30, 20, -Color
black
51. Open the Tube: deco_6
52. Edit- Copy -Activate your work
- Edit-Paste as new layer
53. Pick Tool: (K) on your keyboard -Enter these parameters on the Toolbar
Position X 556 --- Position Y 235
54. Effects- 3D-Effects-Drop Shadow with these settings: 0, 0, 30, 20, -Color
black
55. Layers- Duplicate
Pick Tool: (K) on your keyboard -Enter these parameters on the
Toolbar : Position X 665 --- Position Y( -10)
56. Open the Tube : deco_7
57. Edit- Copy -Activate your work
- Edit-Paste as new layer
58. Pick Tool: (K) on your keyboard -Enter these parameters on the Toolbar:
Position X 675 --- Position Y 189
59. Effects- 3D-Effects-Drop Shadow with these settings: 0, 0, 30, 20, -Color
black
60. Open the Tube : deco_8
61. Edit- Copy -Activate your work
- Edit-Paste as new layer
62. Pick Tool: (K) on your keyboard -Enter these parameters on the Toolbar :
Position X 436 ---- Position Y 23
63. Edit-Copy Special-Copy Merged
64. Selections- Select All
65. Image - Add Borders-Symmetric checked: 50 Px -Color white
66.
Selections- Invert
67. Edit-Paste -Into Selection
68. Adjust- Blur- Gaussian Blur-Radius 25
69. Effects-Plugins -AAA Frames/ Foto Frame… Width 25, Matte 5
70.Selections- Invert
71. Effects- 3D-Effects-Drop Shadow with these
settings: 0, 0, 30, 20, -Color black
72. Selections- Deselect All
73. Open the Tube :ChocoVSP44
74. Create a selection around the watermark.
75. Selections- Invert
76.
Edit- Copy
77. Activate your work
- Edit-Paste as new layer
78. Image-Resize 20%
Resize all layers not checked !
79. Remove the watermark.
80. Effects- 3D-Effects-Drop Shadow with these settings: 0, 0, 30, 20, -Color
black
81. Edit-Repeat-Drop Shadow .
82. Move to the left side
83. Image-Resize 800 PX
84. Adjust-Sharpness-Sharpen
85. Place your name or watermark
86. Save as JPG
I hope you enjoyed this lesson
I look forward to seeing your work.
Send it to me in original size.
To see your achievements. Here
Please do include your name and the number and the title of
this lesson
Good Luck !
Thank you all for making this lesson
Questions related to the lesson ? Or submit the lesson?
Mail me
Greetings Castorke


Copying this lesson, in whole or in part, without the
author's permission is prohibited.
The lessons are registered with TWI

België
2021