Click on the flag for the
translation..
This lesson was written by myself
Any resemblance with an existing lesson is a coincidence
This tutorial was made with Psp 9 but can be done with other versions of Psp
The colours may vary significantly depending on the Psp used. . .
Material:
Tubes : Scrap GS-Hop_into_Spring and shared in groups.
Masker - Domie
Thanks to the tubsters for the beautiful material.
Without them, this lesson would not be possible.
Respect their work, don't change anything about the tubes and don't say they
are your tubes
The copyright belongs to the original artist.
Leave credit with the creator.
Filters:
Flaming Pear/ Flexify 2, *** VM Distortion/ Radial Pox.*** Import this filter into Unlimited 2
Material
Let's start the lesson .
Take me with you, I'll show you where you left off.

Open the Tube: the tubes in a map of your choice or in the program PSP.
Save your work regularly !
Place the Gradient in the folder Gradients of your psp.
Open the Tube: the tubes duplicate and close the original one.
1. Open the Tube: easter_les29_Color palette

2. Open the Tube: alpha channel_lessons 29_pas
3. Shift+D Duplicate
4. Close the original and continue working on the copy.
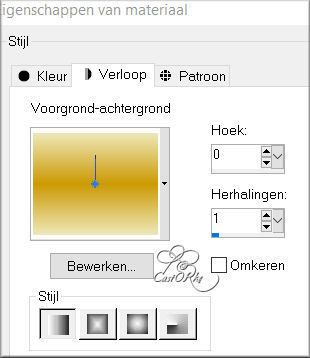
5.-Material Properties: Set your Foreground color to color 1
Set your Background color to color
Replace your Foreground
color with a Foreground/Background Linear Gradient configured like this
Flood Fill Tool – Fill the layer with the Gradient
6. Effects- Image Effects- Seamless Tiling using the default settings
7. Layers- Duplicate
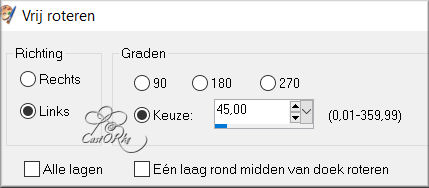
8. Image- Free Rotate-45 Left
9. Layers-Properties-Set the Blend Mode to " Screen "
10. Layers- Duplicate
11. Image - Mirror - Mirror Horizontal (Image - Mirror in older versions of
PSP)
12. Layers-Properties-Set the Blend Mode to " Multiplikation"
13. Layers- Merge- Merge Down
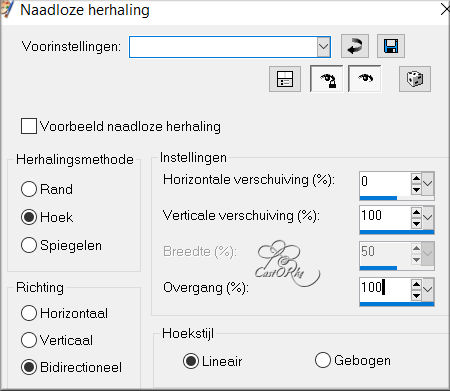
14. Effects- Image Effects- Seamless Tiling use the settings below
15. Layers- Duplicate
16. Image - Mirror - Mirror vertical ( Image - Flip in older versions of PSP)
17. Layers-Properties-Set the Blend Mode to " Luminance Legacy "
18. Adjust-Sharpness-Sharpen More
19. Selections-Load/Save Selection-Load Selection From Alpha Channel -Selection 1.
20. Selections-Promote Selection to Layer
21. Open the Tube: the Tube: 0_d6384_722daa67_L
22. Edit- Copy
23. Activate your work
24. Edit-Paste as new layer
25. Slide into selection...
26. Layers- Merge- Merge Down
27. Selections- Deselect All
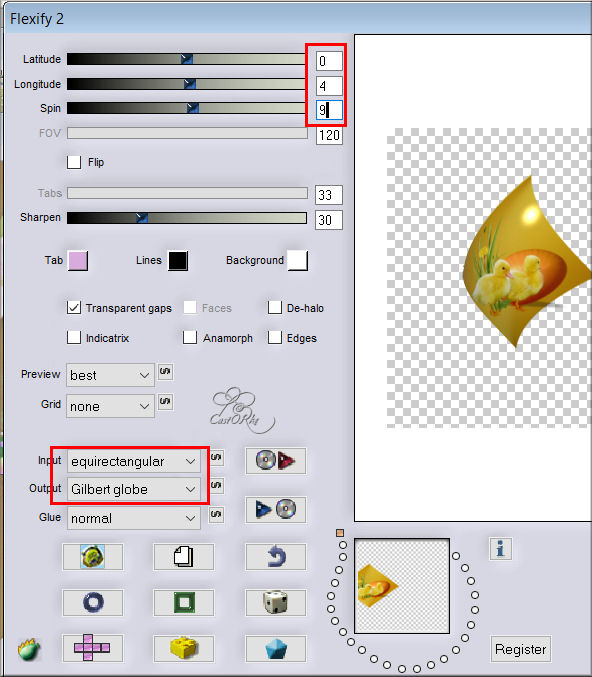
28. Effects-Plugins- Flaming Pear/ Flexify2 use the settings below
29. Pick Tool: (K) on your keyboard -Enter these parameters on the Toolbar
Position X 97 -Position Y -1

30. Layers- Duplicate
31. Image - Mirror - Mirror Horizontal (Image - Mirror in older versions of
PSP)
32. Layers- Merge- Merge Down
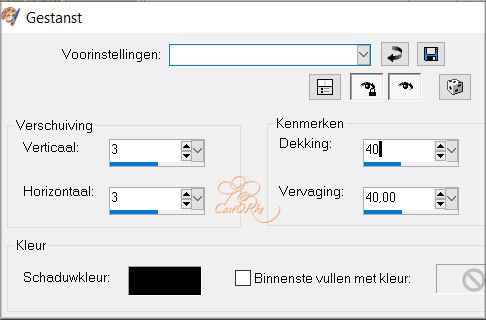
33. Effects-3D-Effects- Drop Shadow with these settings: -1, -1, 75, 10 -Color
6 (black)
34. Activate copy of background layer/second layer from below
35. Layers-Properties-Set the Blend Mode to " Multiplikation"
36. Adjust-Sharpness-Sharpen More
37. Open the Tube: Deco_les29
38. -Edit - Copy- Activate your work -Edit - Paste as new layer -Do not move
, it is in the right place
39. Layers- Duplicate
40. Image - Mirror - Mirror Horizontal (Image - Mirror in older versions of
PSP)
41. Activate the top of the layer palette
42. Open the Tube: GS-Hop_into_Spring_ele22
43. Edit- Copy
44. Activate your work
45. Edit-Paste as new layer
46. Place at the bottom left (see finished image)
47. Effects-3D-Effects- Drop Shadow with these settings: 0, 0, 30, 30 -Color
6
48. Layers- Duplicate
49. Image - Mirror - Mirror Horizontal (Image - Mirror in older versions of
PSP)
50. Open the Tube: 0_f9150_64a3ff2_orig
51. Edit- Copy
52. Activate your work
53. Edit-Paste as new layer
Image-Resize 2 x 75%
Risize all layers not checked
54. Put in the right place or of your own choice
55. Effects-3D-Effects- Drop Shadow with the same settings
56. Open the
Tube: 0_f9151_de7f03a3_orig
57. Edit- Copy
58. Activate your work
59. Edit-Paste as new layer
60. Image-Resize 1 x 75% , and 1 x 80%
Risize all layers not checked
61. Put in the right place or of your own choice
62. Effects-3D-Effects- Drop Shadow with the same settings
63. Open the
Tube: GS-Hop_into_Spring_ele9
64. Edit- Copy
65. Activate your work
66. Edit-Paste as new layer
67. Image-Resize 70%
68. Put in the right place or of your own choice
69. Effects-3D-Effects- Drop Shadow with the same settings
70.
Adjust-Sharpness-Sharpen
71. Open the Tube: GS-Hop_into_Spring_ele6
72. Edit- Copy
73. Activate your work
74. Edit-Paste as new layer
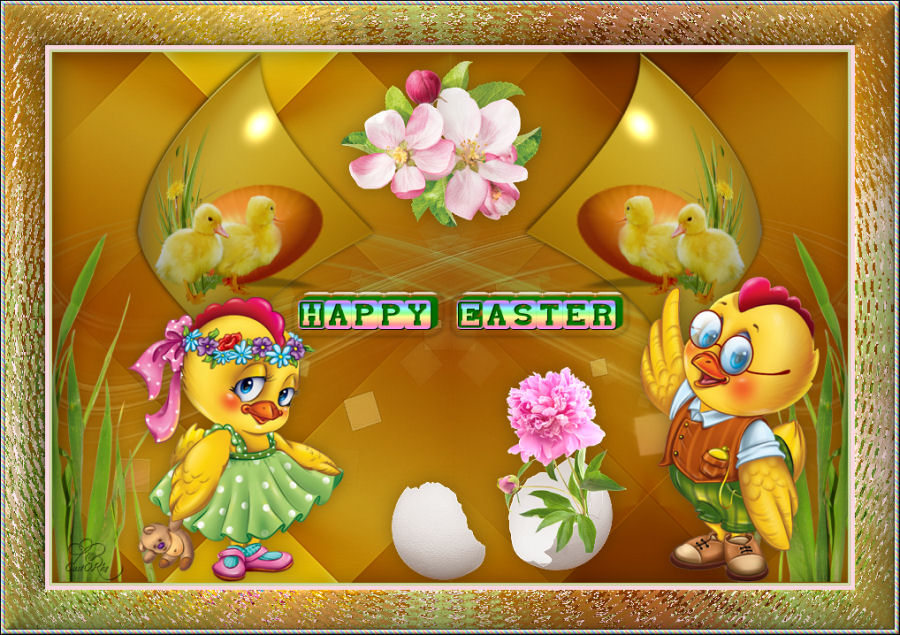
75. Place at the bottom (see finished image)
76. Open the Tube: GS-Hop_into_Spring_ele12
77. Edit- Copy
78. Activate your work
79. Edit-Paste as new layer
80. Image - Mirror - Mirror Horizontal (Image - Mirror in older versions of
PSP)
81. Image-Resize 70%
82. Place in the eggshell (see finished image)
83. Remove the small stem at
the bottom of the flower
84. Layers- Merge- Merge Down
85. Effects-3D-Effects- Drop Shadow with the same settings
86. Open the
Tube: text_HappyEaster.
87. Edit- Copy
88. Activate your work
89. Edit-Paste as new layer
90. Put in the right place or of your own choice
91. Activate the top of the layer palette
92. Selections-Select All
93. Layers- New Raster Layer
94. Effects-3D-Effects-Cutout use the settings below
95. Selections- Deselect All
96. Image - Add Borders-Symmetric checked: 1 Pixel -Color 4
97. Image - Add Borders-Symmetric checked: 1 Pixel -Color 3
98. Image - Add Borders-Symmetric checked: 1 Pixel -Color 4
99. Image - Add Borders-Symmetric checked: 5 Pixels -Color 3
100. Selections-Select All
101. Image - Add Borders-Symmetric checked: 45 Pixels-Color 4
102. Effects- Image Effects- Seamless Tiling using the default settings
103. Selections-Invert
104. Adjust-Blur-Gaussian Blur-Radius 35%
105. Effects-Plugins- Unlimited 2/ VM Distortion/ Radial Pox.
using the default settings
106. Edit-Repeat- VM Distortion/ Radial Pox.
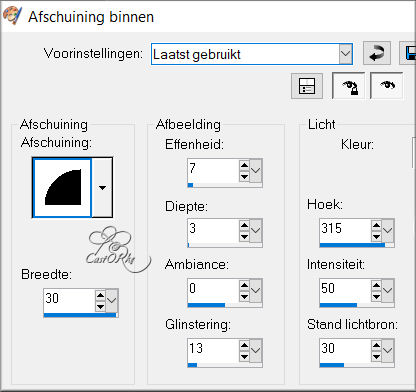
107. Effects-3D-Effects-Inner Bevel use the settings below Nr 2
108. Selections-Select All
109. Image - Add Borders-Symmetric checked: 5 Pixels -Color 3
110. Selections-Invert
111. Material of the Foreground: Change material of the Foreground into Gradient,
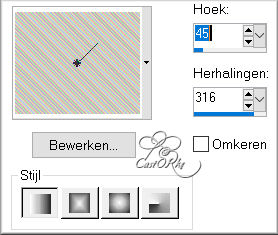
Select Gradient - castorke_les29_pastel
Or create your own Gradient in your own colors
Linear Angle 45 Repeat 316
Flood Fill Tool-Fill the selection with the Gradient
112. Adjust-Sharpness-Sharpen.
113. Repeat-Effects-3D-Effects-Inner Bevel with the same settings
Selections- Deselect All
114. Place your name or watermark .
115. Image - Add Borders-Symmetric checked: 1 Pixel -Color 6
116. Save as JPG
I hope you enjoyed this lesson
I look forward to seeing your work.
Send it to me in original size.
To see your achievements. Here
Please do include your name and the number of this lesson
Good luck!
Thank you all for making this lesson
Questions related to the lesson ? Or submit the lesson?
Mail me
Greetings Castorke


Copying this lesson, in whole or in part, without the author's permission is
prohibited.
The lessons are registered with TWI

België
2022