Click on the flag for the translation.
This lesson was written by myself..
This tutorial was made with PSP X8 but can be done with other versions of Psp.
Tubes: : Scrap Sexy tart.
Unlimited2/ &Background Designers <IV>/ sf10 Shades of shadow.
AAA Frames/ Fotoframe.
Thank you makers and creators for making these wonderful tubes
Leave the watermark of the tube intact
The copyright belongs to the original artist.
Leave credit with the creator.
Unzip your material into a folder that you can easily access
Let's start the lesson
Take me with you, I'll show you where you left off.

1. Open your color palette in your psp._val_les37

2. Material Properties: Set your Foreground color to color 1: #a00605
- Set your Background color to color 2: #ffffff
3. Open Alpha Channel : castorke_val_les37_alfakanaal.
4. Duplicate the IMAGE ( SHIFT + D ) and close the original.
On this, we will continue to work.
5. Selections- Select All
6. Open the image "p8 "
7. Edit- Copy .
8. Activate your work.
9. Edit - Paste into Selection
10. Selections- Modify- Contract 35 Px
11. Press Delete or Edit/Cut.
12. Selection remains activated.
13. Layers- New Raster Layer.
14. Open the image "p4"
15. Edit- Copy .
16. Activate your work.
17. Edit - Paste into Selection
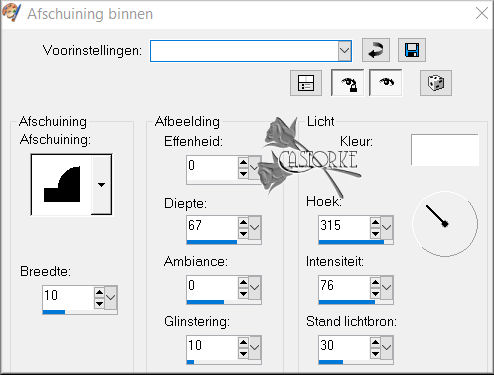
18. Effects-3D-Effects- Inner Bevel use the settings below. No 3
19. Selections- Modify- Contract 40 Px
20. Layers- New Raster Layer.
21. Activate Flood Fill Tool-fill the selection with color 1
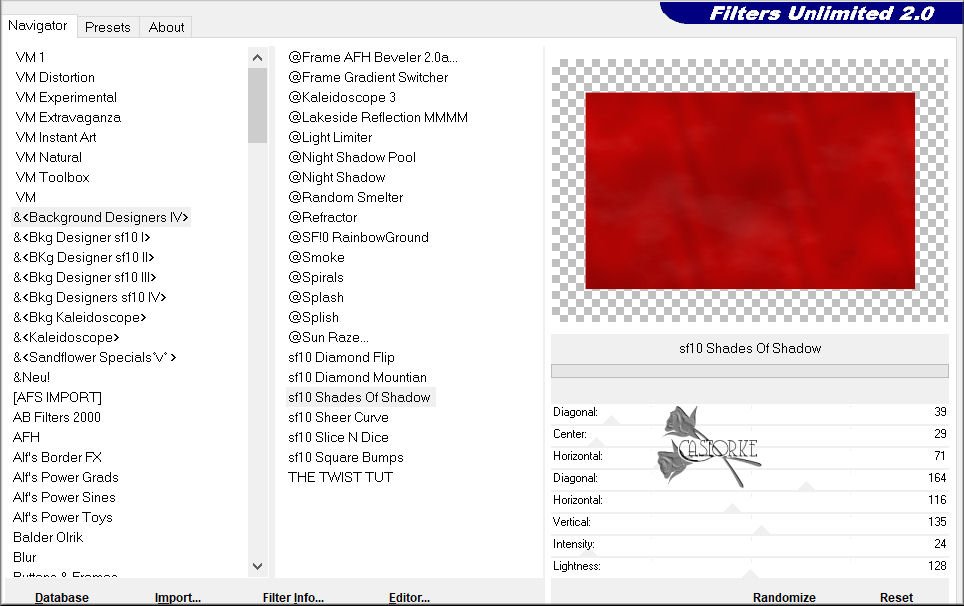
22. Effects/ Plugins/Filters in Unlimited2/ &Background Designers <IV>/ sf10 Shades Of Shadow
using the default settings.
23. Layers- New Raster Layer.
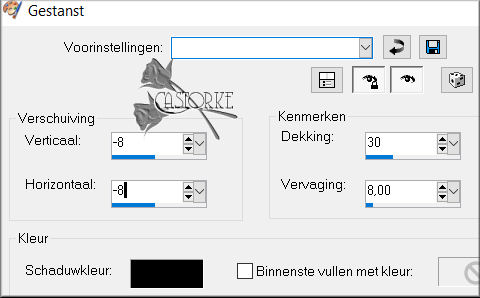
24. Effects/ 3D-effects/ Cutout use the settings below.
25. Layers- New Raster Layer.
26. Repeat: / Effects/ 3D-effects/ Cutout-but Vertical and Horizontal 8 and Ok
27. Selections- Select None.
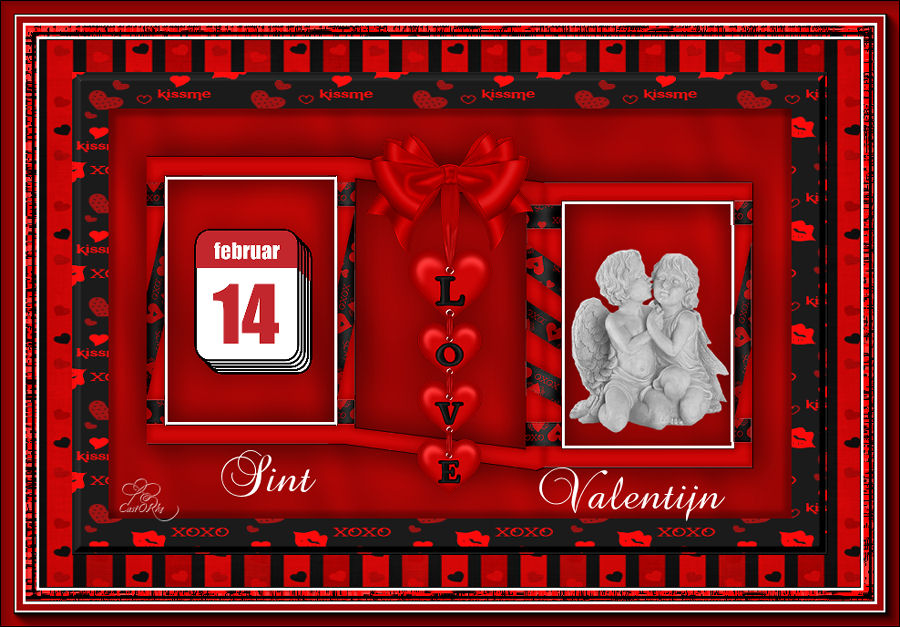
28. Open the Tube "frame "
29. Edit- Copy .
30. Activate your work.
31. Edit - Paste as new layer.
32. Image- Resize 75%
Resize all layers not checked
33. Effects- 3D-Effects-Drop Shadow with these settings: 0, 0, 30, 50 color black.
34. Effects- 3D-Effects-Drop Shadow with these settings: 1, 0, 100, 0 color black.
35. Effects- 3D-Effects-Drop Shadow with these settings: (min) -1, 0, 100, 0 color black.
36. Open the Tube "ele16"
37. Edit- Copy .
38. Activate your work.
39. Edit - Paste as new layer .
40. Image- Resize- 2 X 75% and 1 X 90%
Resize all layers not checked
41. Move the tube in the third window of the frame ( see finished image).
42. Effects- 3D-Effects-Drop Shadow with these settings: 0, 0, 30, 50 color black.
43. Open the tube "calendar-156587_1280"
44. Edit- Copy .
45. Activate your work.
46. Edit - Paste as new layer.
47. Image- Resize - 3 x 50%
Resize all layers not checked
48. Move the Tube in the first window of the frame ( see finished image).
.
49. Effects- 3D-Effects-Drop Shadow with these settings: 0, 0, 30, 50 color black.
50. Open the Tube "lovehanger "
51. Edit- Copy .
52. Activate your work.
53. Edit - Paste as new layer..
54. Image- Resize -90%
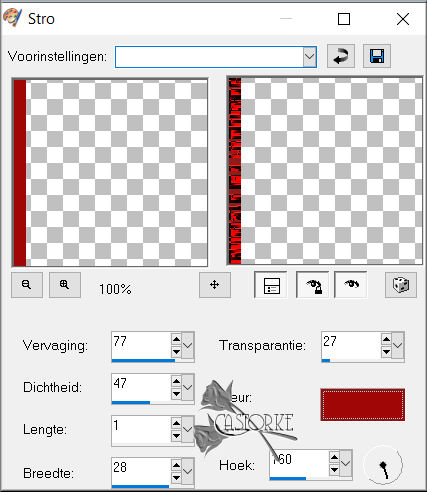
Resize all layers not checked
55. Do not move, it is in the right place
56. Effects- 3D-Effects-Drop Shadow with these settings: 0, 0, 30, 50 color black.
57. Layers- New Raster Layer.
58. Selections/Load/Save Selection/Load Selection from Alpha Channel - selection 1
59. Activate Flood Fill Tool-fill the selection with color 2 (white)
60. Selections- Modify- Contract 3 Px, press Delete.
61. Layers- New Raster Layer.
62. Selections/Load/Save Selection/Load Selection from Alpha Channel - selection 2
63. Activate Flood Fill Tool-fill the selection with color 2 (white)
64. Selections- Modify- Contract 3 Px , press Delete.
65. Open the Tube "text sint valentijn."
66. Edit- Copy .
67. Activate your work.
68. Edit - Paste as new layer..
69. Put the Tube in the right place or of your own choice.
70. Image - Add borders-Symmetric checked: 1 Px color 3
71. Image - Add borders-Symmetric checked: 3 Px color 2
72. Image - Add borders-Symmetric checked: 12 Px color 1
73. Activate your Magic Wand Tool select the red border.
74. Effects/ Textureffects/ Straw Wall color 1 (red)
75. Effects-3D-Effects- Inner Bevel. No3
with the same settings
76. Selections- Select None.
77. Image - Add borders-Symmetric checked: 3 Px color 2
78. Image - Add borders-Symmetric checked: 25 Px color 1
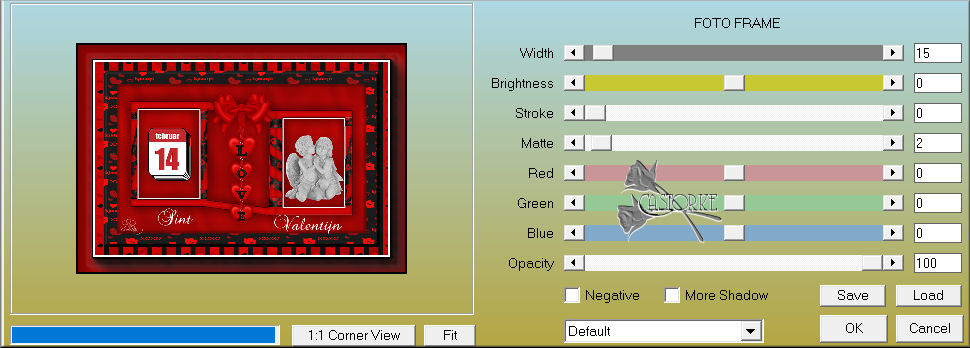
79. Effects/ Plugins/ AAA Frames/ Fotoframe - Widh 15 , Matte 2
80. Image- Resize 900 Pixels width-Resize all layers- Checked .
81. Add you watermark on new layer..
82. Save as JPG
I hope you enjoyed this lesson
I am curious to see your work. Please send it to me in original size.
Do include your name, the lesson number, and the title.
I'll post it with the other works
HIERGood luck !
Questions related to the lesson ? Or submit the lesson?
Mail meGreetings Castorke